Manage assets
You can manage all your assets and tie them to requests, inventory, and PMs.
You need the Add Assets permission to add assets either manually or by importing them. To edit existing assets, you need the Edit Assets permission.
|
Note: You can move assets from one location to another, and assign assets to one or more users using Quick Update Assets. |
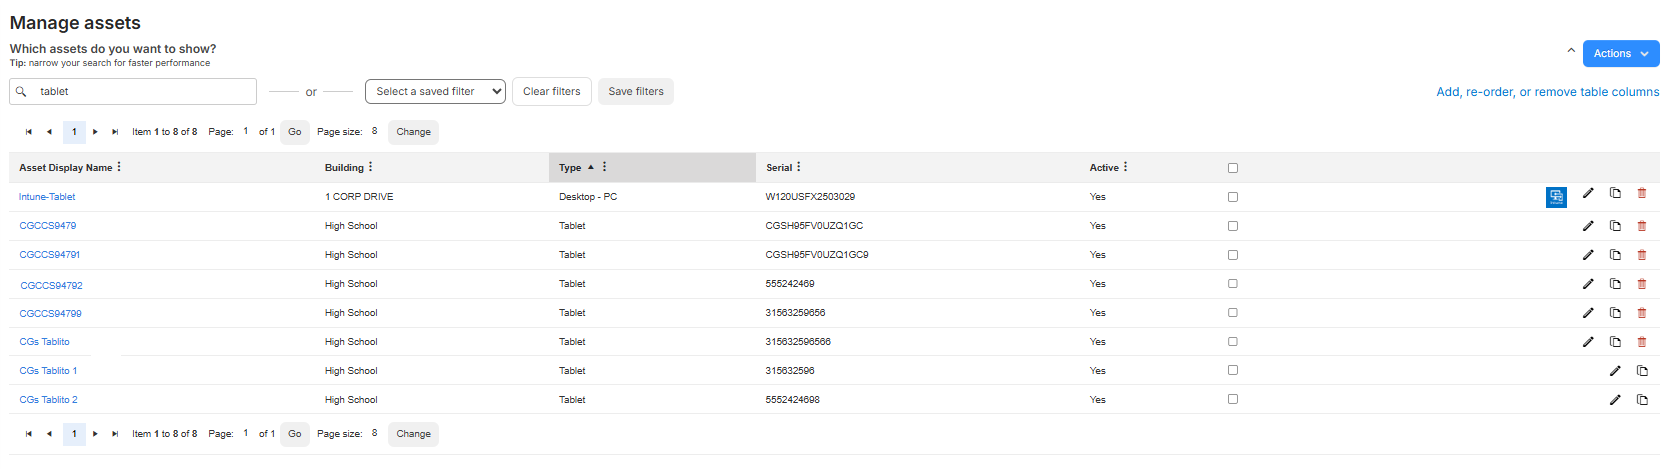
To access the Manage Assets page, select Assets > View All Assets or View All Assets (all fields).
You can do the following on the Manage Assets page:
- Customize your view
- Search for an asset
- View asset details
- Add an asset
- Edit an existing asset
- Duplicate or delete an existing asset
- Inactivate an asset
- Mass update assets
- Transfer an asset
- Create a QR (code) Report
- Perform an asset audit
- Select Assets > View All Assets or View All Assets (all fields).
- Find an asset by searching or using a filter(s).
Note: To view all assets, in the column of your choice, click
 . In the filter (
 ) section, select Check All, and then click Filter.
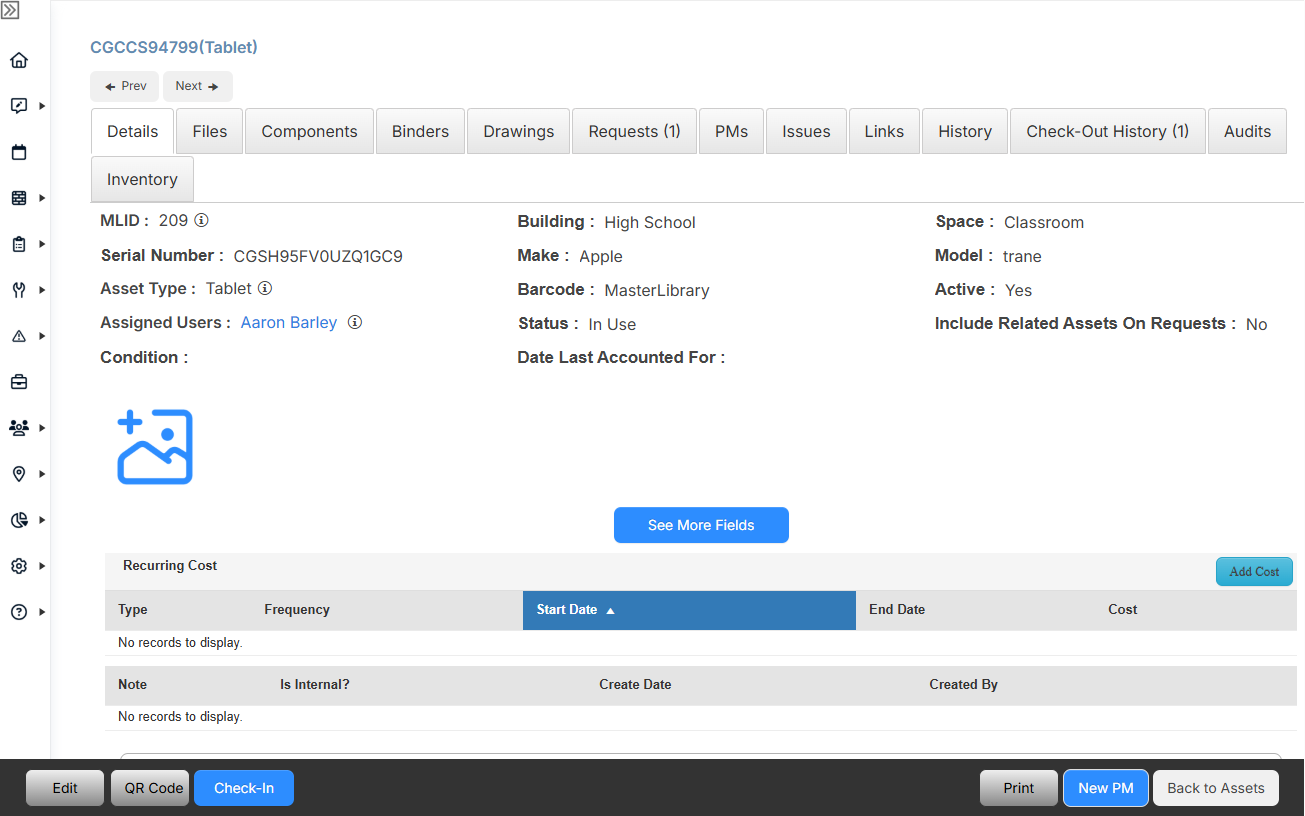
 - Click the asset you want. The Asset Details page appears.
Notes:
- At the top-left, click Prev or Next to move from asset to asset without returning to the Manage Assets page.
- To see the complete record, click See More Fields.
- To hide extra fields, click See Fewer Fields.
- Select Assets > View All Assets or View All Assets (all fields).
- Select Actions > Add Asset.
- From the Asset Type drop-down, select the applicable asset.
Note: Depending on the selected Asset Type, you can associate it with Sub Types, and corresponding fields will appear.
- Enter a Barcode for the asset.
Note: If the Auto Generate Barcode for New Assets setting (in General Settings > Assets tab) is turned on, you can leave this field blank and it will populate. Auto-generated barcodes are 10 characters, start with a 5, and can contain numbers, uppercase letters, and the following characters: minus (-), plus (+), period (.), dollar sign ($), slash (/), and percent (%).
- In the Components field, start typing the name of the related asset, and then select it from the list that appears.
Note: When you check out or check in a main asset, all of its linked component assets are also scanned.
- To ensure accurate records, complete as many fields as possible in the Manage Assets section.
- In the General Information section, populate the Asset Name, Building, and Space fields.
- Complete as many of the remaining fields in the General Information and all remaining sections.
- Do one of the following:
- To save the asset record and open the asset details page, click Save.
- To save the asset record and duplicate all of the information entered into another template, click Save and Copy.
- To save the asset record and create a new record, click Save and Add.
- Select Assets > View All Assets or View All Assets (all fields).
- Find an asset by searching or using a filter(s).
Note: To view all assets, in the column of your choice, click
. In the filter () section, select Check All, and then click Filter. - Next to the asset you want to edit, click
 .
. - Do any of the following:
- Make the desired changes.
- To add an image(s), click
 , select the file(s), and click Open.
 - To delete an asset, click Delete.
- Click Save.
To duplicate or delete an existing asset:
- Select Assets > View All Assets or View All Assets (all fields).
- Find an asset by searching or using a filter(s).
Note: To view all assets, in the column of your choice, click
. In the filter () section, select Check All, and then click Filter. - Next to an asset, do one of the following:
- To copy an asset, click
 .
. - To delete an asset, click
 .
. - To inactivate an asset, click
 .
.
- To copy an asset, click
To inactivate an existing asset:
- Select Assets > View All Assets or View All Assets (all fields).
- Find an asset by searching or using a filter(s).
Note: To view all assets, in the column of your choice, click
. In the filter () section, select Check All, and then click Filter. - Next to the asset you want, do one of the following:
- Click . Then scroll to the bottom of the page, and click Inactivate.
- Click the Asset Display Name.
- At the bottom of the page, click Edit.
- Scroll to the bottom of the page, and click Inactivate.
- Click the Asset Display Name.
- On the asset's Details tab, hover over Active and then click it.
- On the drop-down that appears, click No, and then click
 .
.