Set up request categories for walk-through mode
By default, users submit requests in walk-through mode, which guides them through a graphical, step-by-step process.
| Note: To disable walk-through mode and use a single-page request form, you need the Manage Site Settings administrative permission. |
You must set up request categories to use walk-through mode. You can customize each step to ensure administrators receive the information they need, and the appropriate people are assigned and notified about the request.
Request categories form a hierarchy with unlimited levels. Child categories inherit all fields from their parent categories.
|
Example: Suppose you have a top-level request category called Device/Hardware, with a custom field for "Have you tried restarting your device?". Any request categories nested under Device/Hardware will display the "Have you tried restarting your device?" field. |
To add new request categories:
- Select Settings > Manage Request Types.
- Next to the request type you want, click
 . The Request Categories page appears.
Note: If the Manage Request Categories icon
does not appear next to a request type, walk-through mode is not enabled for that request type. 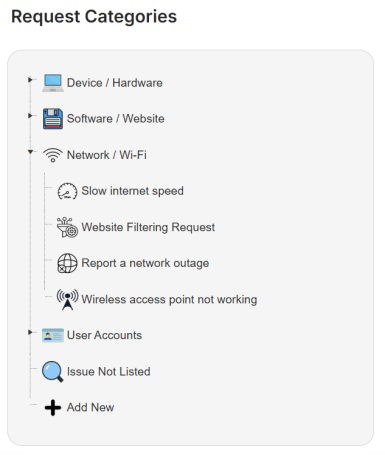
- Click + Add New. The new category fields appear.
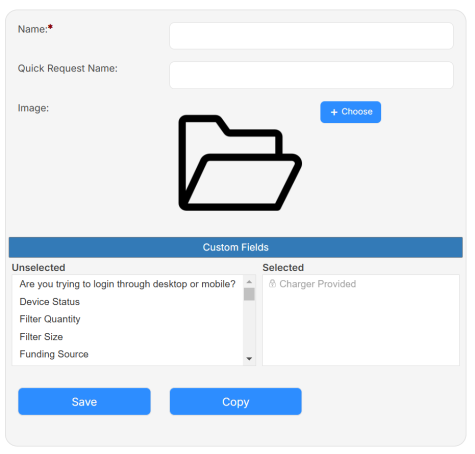
- Enter a Name.
- To allow users to select Other when their issue isn’t listed during request submission, turn on the Allow Other toggle.
- To require users to complete all requested custom fields when they submit a request, turn on the Require Custom Fields toggle.
Note: When you turn on this option for a category, all child categories inherit the setting. You can add fields to child categories but cannot remove fields inherited from parent categories.
- To create a quick request, enter the Quick Request Name.
Note: Adding a Quick Request Name lets users submit requests for common issues with one click.
- To add an image:
Note: This adds a visual icon to the category. The default image is a folder icon.
- Click + Choose.
- Select the desired image.
- Click Open.
- To add a custom field:
- In the Unselected column, select the field you want to add.
- Drag and drop the field into the Selected column.
- To sort the fields in the Selected column, drag and drop them into the desired order.
- Click Save.
- Drag and drop the new request category to the desired location in the Request Category hierarchy.
To copy request categories:
- Select Settings > Manage Request Types.
- Next to the request type you want, click . The Request Categories page appears.
- Find the category you want in the hierarchy, and click it.
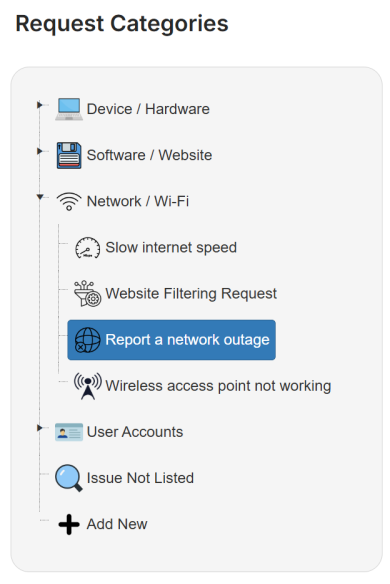
- The category fields appear. Click Copy. The Copy Category pop-up appears.
- Enter a unique Name.
- To Copy Sub-Catagories, ensure the toggle is on.
- To Copy Fields, ensure the toggle is on.
- Click Save.
- Drag and drop the copied request category to the desired place in the Request Category hierarchy.
To delete request categories:
- Select Settings > Manage Requests Types.
- Next to the request type you want, click
 .
.Notes:
- If a request category is associated with an existing request, the delete icon will not appear.
- If a request category is not associated with an existing request but is associated with either auto-assign or auto-notify, the delete icon appears and a pop-up informs users they must remove the request category from auto assign/auto notify first.
- Click OK to delete the category.