Integrate with Mosyle MDM
If your district uses Mosyle, you can integrate it to sync your assets.
Users with the Manage Users and Permissions user permission can set up the integration.
|
Important: Because of the technical knowledge required, your district’s IT administrator (or someone with a similar role) should perform this procedure to integrate Mosyle. |
|
Notes:
|
This is a two-step process:
- Obtain credentials from Mosyle.
- In IT Asset Manager, set up the Mosyle integration by completing the following tabs:
Obtain credentials from Mosyle
You will need the following credentials from Mosyle to complete the integration:
- Administrator email
- Password
Note: If you need to change your Mosyle password, make sure the password is updated in IT Asset Manager on the Connection tab.
- Access token
- Select My School > Integrations > Mosyle API Integrations > Add New Token.
- Enter a Profile Name, such as IT Asset Manager.
- Ensure the Access Method is Public.
- Click Save.
Set up the Mosyle integration
Select Settings > Integrations > Mosyle Integration.
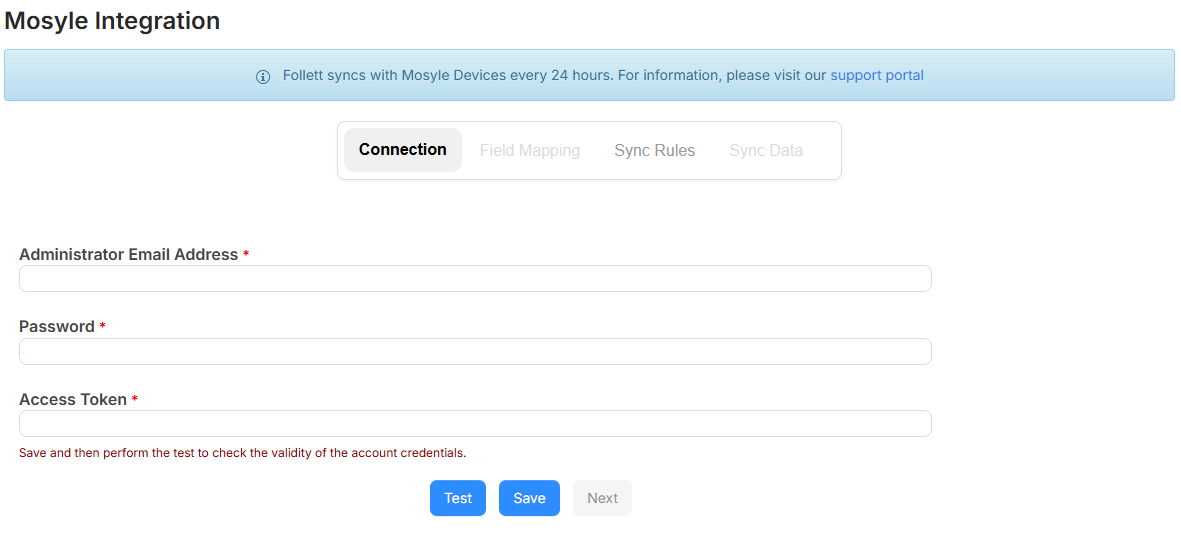
The Connection tab requires you to have information from Mosyle to set up the link. Contact Mosyle support or refer to the Mosyle help documentation to obtain the needed information.
To set up a link to Mosyle:
- Enter your Administrator Email Address used to log in to your Mosyle account.
- Enter your administrator Password used to log in to your Mosyle account.
- Generate an Access Token from your Mosyle account.
- Click Save.
- To test the connection with your credentials, click Test.
Note: Once the Mosyle integration is active, a green banner message appears at the top-left.
-
Click Next to go to the Field Mapping tab.
|
Note: If you need to change your Mosyle login password, you must update the password on the Connection tab to match your latest Mosyle password. |
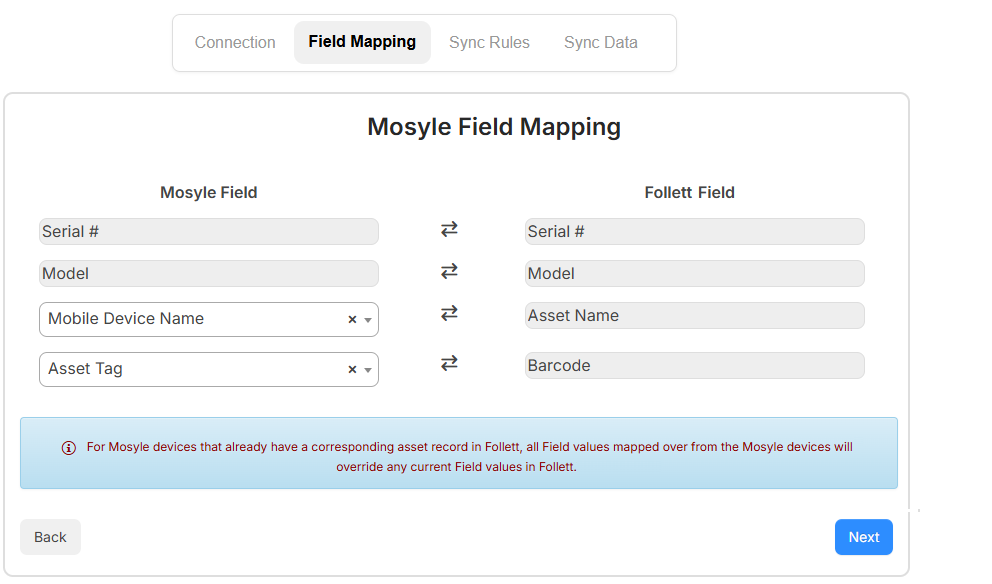
The Serial # and Model fields are automatically mapped.
|
Note: If the Serial # field matches in both systems, the existing asset is updated. Otherwise, a new asset record is created. |
Select the Mosyle field you want to map to the Asset Name and Barcode fields. The following fields are options:
- Serial #
- Asset tag
- Mobile device name
Click Next to go to the Sync Rules tab.
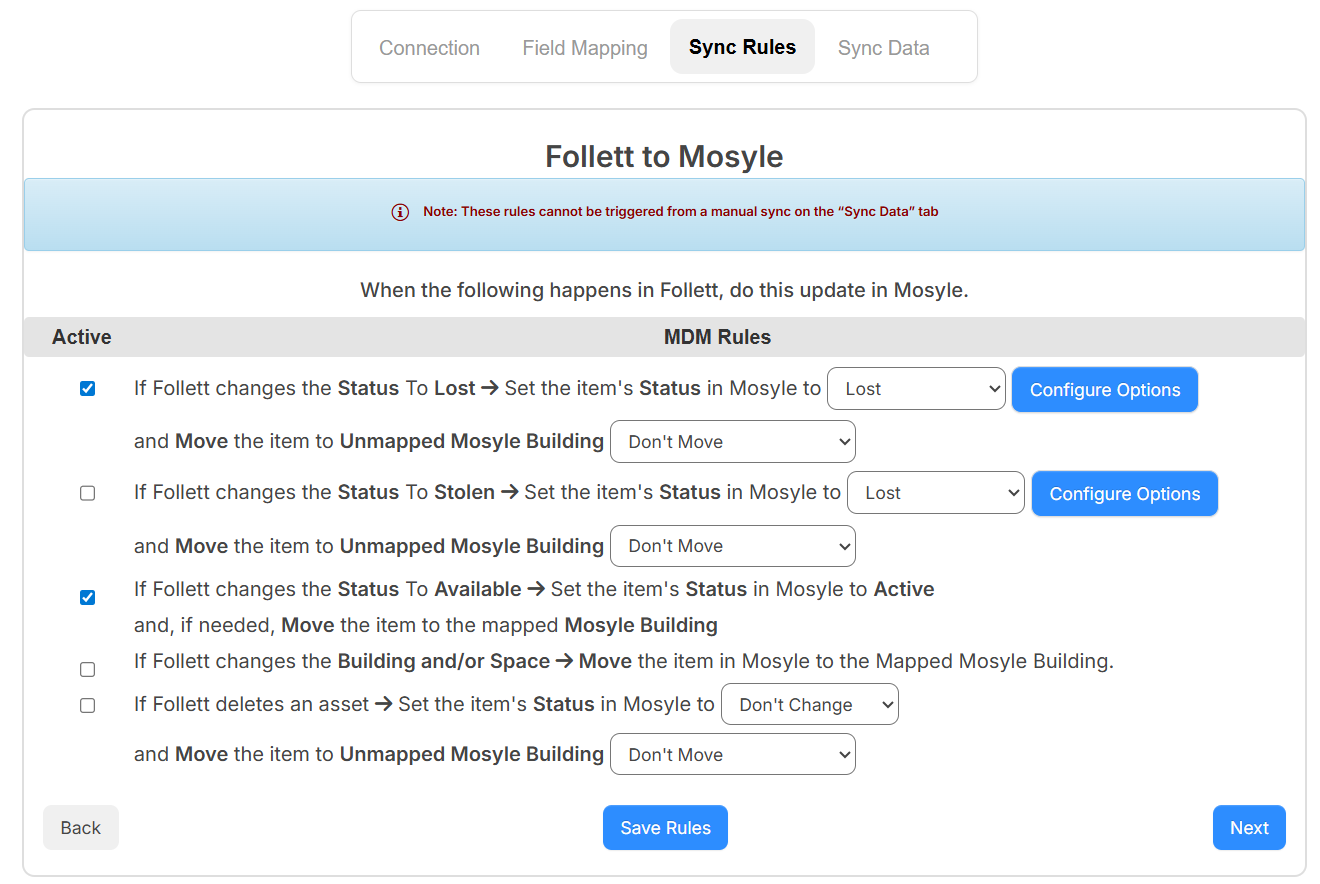
Use this tab to customize the sync rules of how to update Mosyle when something happens in IT Asset Manager.
To set up the sync rules:
- Select/deselect the If Follett changes the Status to Lost > Set the item's Status in Mosyle to checkbox to enable/disable from syncing. From the drop-down, select one of the following:
- Don't Change
- Locked
- Lost
- Wiped
- To set up Mosyle-specific options based on what you selected in the drop-down, click Configure Options.
- From the and Move the item to Unmapped Mosyle Building drop-down, select Don't Move or the applicable building.
- Select/deselect the If Follett changes the Status to Stolen > Set the item's Status in Mosyle to checkbox to enable/disable from syncing. From the drop-down, select one of the following:
- Don't Change
- Locked
- Lost
- Wiped
- To set up Mosyle-specific options based on what you selected in the drop-down, click Configure Options.
- From the and Move the item to Unmapped Mosyle Building drop-down, select Don't Move or the applicable building.
- Select/deselect theIf Follett changes the Status To Available > Set the item's Status in Mosyle to Active and, if needed, Move the item to the mapped Mosyle Building checkbox to enable/disable from syncing.
-
Select/deselect the If Follett changes the Building and/or Space > Move the item in Mosyle to the Mapped Mosyle Building checkbox to enable/disable from syncing. From the drop-down, select one of the following:
- Don't Change
- Locked
- Lost
- Wiped
- Select/deselect the If Follett deletes an asset > Set the item's Status in Mosyle to checkbox to enable/disable from syncing. From the drop-down, select one of the following:
- Don't Change
- Locked
- Lost
- Wiped
- From the and Move the item to Unmapped Mosyle Building drop-down, select Don't Move or the applicable building.Click Save Rules.
- Click Next to go to the Sync Data tab.

Use the Sync Data tab to add device groups. The sync brings in devices tagged to a group added on this tab.
|
Note: Follett recommends you create a single group, and put all devices you want to sync into IT Asset Manager into that group. This way, you only need to add one group. |
To add a group, and sync your Apple devices:
- Click + Add Group.
- Select the group from the Mosyle Group Name drop-down.
- Select a Building and Space.
- Click Save.
- Click OK.
- To initiate a sync for the group, click
 .
. - When the sync is complete, a pop-up shows the total number of devices, total updated, total added, and total not synced. Click OK.
|
Note: New devices and updates to existing assets from the MDM sync nightly, while sync rule actions are processed every 30 minutes. |
Assets that are synced from Mosyle will show an Apple icon next to their name. You can click the Apple icon to open a window with all available Mosyle device fields.