Use the Follett Software Ops app
The Follett Software Ops app lets you submit, view, and approve requests, and view and scan assets. There is a Home tab, Requests tab, Assets tab, and Scan functionality. You can also update the status of requests, and add labor, purchases, assets, notes, and/or files.
The app is available for iOS™ and Android™ devices.
|
Note: If you want to manually update the Follett Software Ops app, you can do so on an Apple® or Android device. |
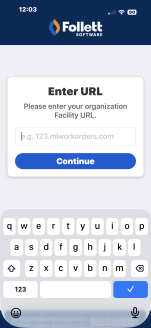
Log in to the app
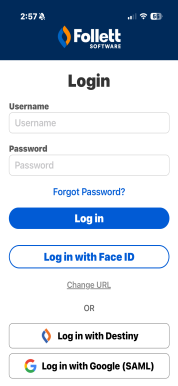
Enter the URL you use on the web app, and then tap Continue.
You can log in manually with your web app username and password. Based on how your district is set up, you can potentially log in using single sign-on with Destiny, Google SSO, Google (SAML), or Microsoft (SAML).

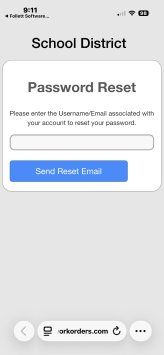
If you forgot your Destiny password , tap Forgot Password?, and follow the prompts. The web app opens. Enter the username or email associated with your account, and tap Send Reset Email. After resetting your password, you can use the new password in the app.
|
Note: If you use SSO or SAML to log in, and tap Forgot Password?, you will receive an email stating you should reach out to your IT department. |
Biometric login
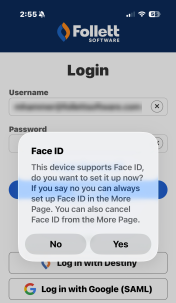
Next time you log in, the option to use face ID (iOS) or biometrics (Android) will appear.
Set up or cancel face ID or fingerprint authentication on the More tab.
Home tab
After you log in, the Home screen appears. Content varies based on your web app permissions. You will see one of the following variations:
- You can only submit a request.
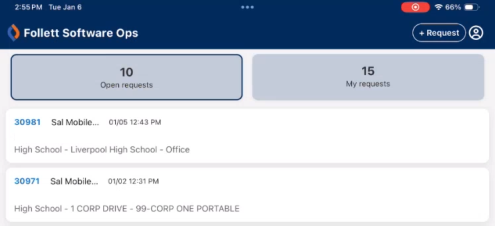
- 'Open requests' are requests you submitted with a status of Pending, Approved, Assigned, In Progress, or On Hold.
- 'My requests' includes all requests with open statuses, as well as Closed, Completed, Canceled, Duplicated, and Declined.
- You can only approve and submit requests.
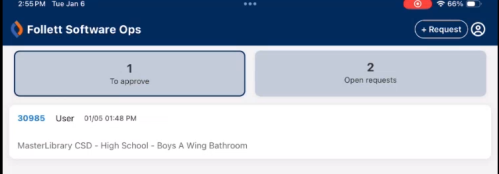
- 'To approve' shows requests that are pending your approval.
- 'Open requests' are requests you submitted with a status of Pending, Approved, Assigned, In Progress, or On Hold.
- You are assigned requests.
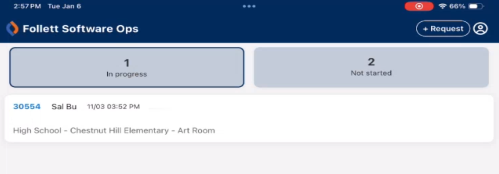
- 'In progress' are requests assigned to you that are started.
- 'Not started' are requests assigned to you that you haven't started.
- You can submit, approve, and view all requests.
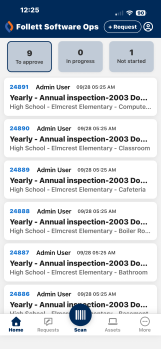
- 'To approve' shows requests that are pending your approval.
- 'In progress' are requests assigned to you that are started.
- 'Not started' are requests assigned to you that you haven't started.
Submit a request
To submit a request, tap + Request. The process uses walk-through mode, which takes you step-by-step through each field you must complete.
Requests tab
You will see any request you have access to on the Requests tab. For example, if you have the ability to approve requests and are a technician, you may also see requests that have already been approved but not assigned to you.
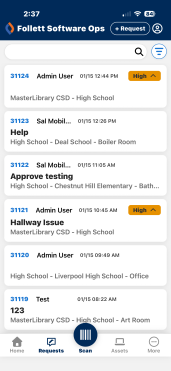
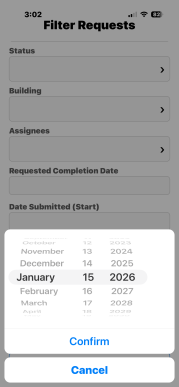
You can search for a specific request, or use ![]() to pull up the Filter Requests screen.
to pull up the Filter Requests screen.
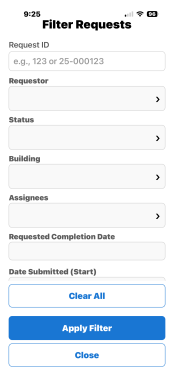
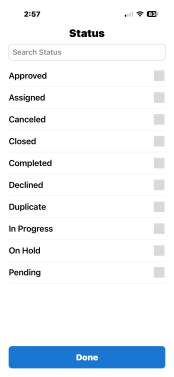
Select the Requestor, Status, Building, or Assignees filter, and then tap the checkboxes on the right side of the screen.
All date field filters use a date picker.
Request details
Tap a request to see its details.

When a request is open and if you have the Edit WOs permission, you can edit the following fields on the request details screen:
- Description
Note: Rich HTML editing is not supported in the Ops app.
- Notes
- Priority, Complete By, Budget Code, and Project fields in the Other details section
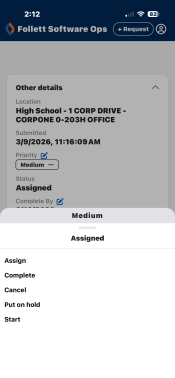
You can update the status. Tap the up arrow at the bottom of the screen. The current status shows below the priority, and available statuses are below that.
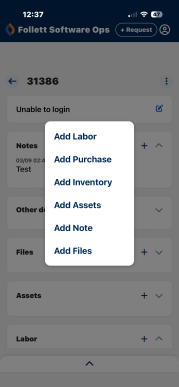
To add labor, a purchase, inventory, assets, a note, and/or files, tap ![]() . Options appear.
. Options appear.
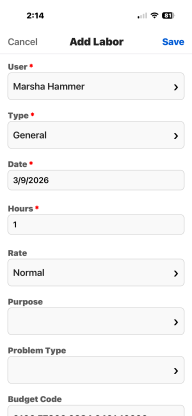
Use the app to add labor for a request. User, Type, Date, and Hours are required fields. When you're done, tap Save.
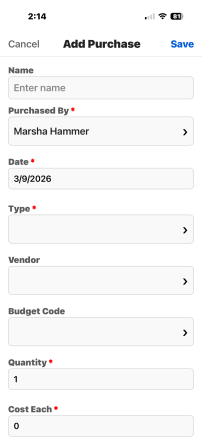
Use the app to add or edit purchases, such as specific materials or contractual services, for a request. Purchased By, Date, Type, Quantity, and Cost Each are required fields. When you're done, tap Save.
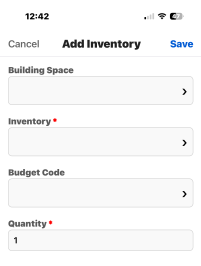
Use the app to add or edit inventory, such as keyboards or other items, for a request. Inventory and Quantity are required fields. When you're done, tap Save.
Use the app to add related assets to a request.
- Next to the asset, tap Add.
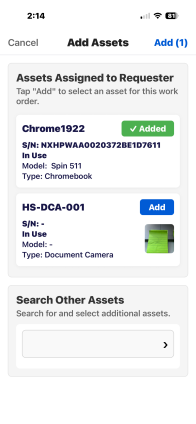
- Tap Add (#) at the top of the screen.
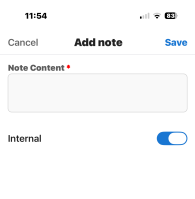
- Enter information about the request in the Note Content field.
- Admin users can use the Internal toggle to add a note. This makes the note visible to and alerts users who can assign or are assigned the request (but not the requestor).
- Tap Save.
Use the app to add up to 10 related files (maximum 5 MB each) to a request.
- Tap Add Files.
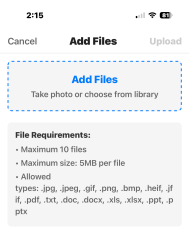
- Take a photo, or choose from your library.
- Continue to add files.
- Tap Upload at the top of the screen.
When you add labor, purchases, inventory, assets, a note, and/or files, the information appears at the bottom of the request details screen.
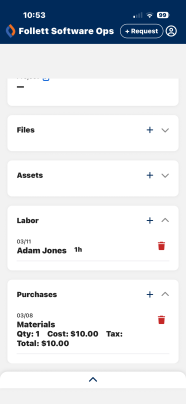
To edit data, tap the applicable option. Make any updates, and tap Save at the top of the screen.
To delete, click ![]() next to the applicable option.
next to the applicable option.
Assets tab
If you have the View Assets or Edit Asset permission, you will see the Assets tab. Only the assets you have access to in the web app appear.
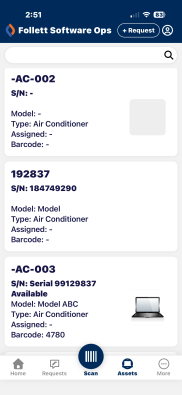
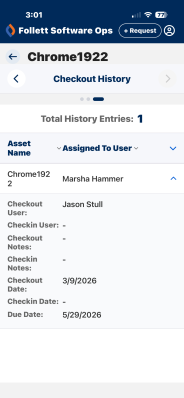
Tap an asset to see its details. You can edit the asset status and condition, check out or in assets based on status, and view circulation history.
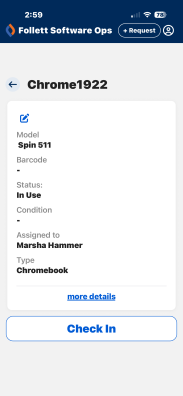
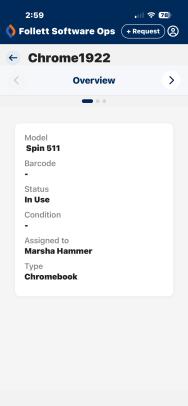
Click more details to see an asset overview, request details, and checkout history. The Overview has general details about the asset. To move to the next screen, click ![]() .
.
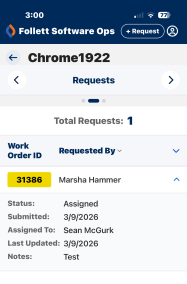
The Requests screen shows the number of requests associated with the asset.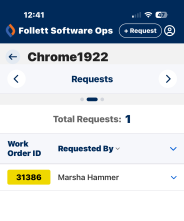
To view more request details, click  .
.
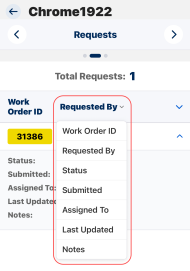
To change the column order, click .
Click ![]() to move to the Checkout History screen. Use to change column orders.
to move to the Checkout History screen. Use to change column orders.
Scan
Use the Scan button to scan asset or user barcodes. Your permissions in the web app and the asset you scanned determine what actions you can take after scanning a barcode.

After scanning a barcode, you may see the following buttons:
- Create request (requires the Enter Asset on WOs permission): Tap this to jump to the walk-through form to create a request with the asset information populated.
- Create new request (requires the Can Submit Request on Behalf of Others permission)
- Check out asset (requires the Edit Assigned User Asset permission)
- Tap Check out asset to open the camera to scan a user barcode.
- Tap Complete Checkout. A confirmation screen appears.
- To send a confirmation email, select the checkbox.
- Tap Checkout.
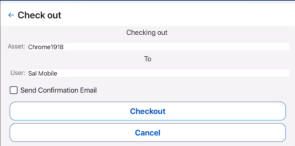
- Tap Done.
- Check in asset (requires the Edit Assigned User Asset permission): Asset is checked out with a status of In Use.
- See asset details (requires the View Assets or Edit Asset permission): Launches the view asset screen.
- Cancel: If this is the only option available, you do not have appropriate permissions to perform any actions.
More tab
To see the app version and to add or cancel face ID (iOS devices) or biometric (Android devices) authentication, tap the More tab.
Log out
![]()
To exit the app, tap the profile icon, and then Log Out.