Integrate with Active Directory
Users with the Manage District Settings user permission can import the district's Active Directory to create user accounts. Then, the Active Directory password is used to authenticate login requests.
This is a three-step process:
- Set up Active Directory integration with IT Asset Manager.
- Import Active Directory users into IT Asset Manager.
- Set up roles and permissions for imported users.
You can also schedule a daily synchronization of Active Directory users.
|
Important: Because of the technical knowledge required, your district's IT administrator will most likely need to perform this procedure. |
Step 1: Set up Active Directory integration
|
Note: Your IT administrator can contact Follett tech support if detailed instructions are needed. |
- Grant the IT Asset Manager server access to your Active Directory server by opening port 636.
- Allow the following IP addresses:
- 20.96.235.248/29 (Additional IP after 4/1/23)
- 20.221.121.48/29 (Additional IP after 4/1/23)
- 20.125.75.224/29 (Additional IP after 4/1/23)
- 52.177.86.104 (Follett's Outbound IP required prior to 10/15/25)
Step 2: Import Active Directory users into IT Asset Manager
- Select Settings > Single Sign On > Active Directory Connection. The Active Directory Integration Admin page appears.
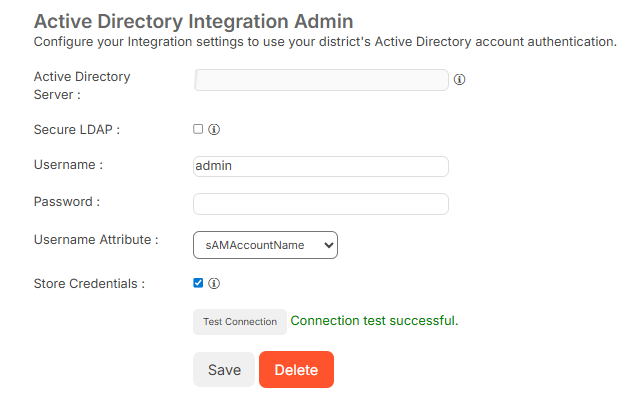
- Do the following:
- Next to Active Directory Server, enter the district's server IP address.
- If you want to use LDAP over a Secure Socket Layer (SSL) for user authentication, select the Secure LDAP checkbox.
- Enter any district Active Directory Username and Password.
Note: Ensure you enter an admin level Active Directory username and password; otherwise, you will have trouble establishing a connection. If the username and password are at admin level, and you still cannot establish a connection, confirm with your network security team they allowed IP Address 20.44.84.177 to connect to the Active Directory Server and opened ports 389 or 636.
- Select the desired Username Attribute.
- To Store Credentials for the automatic Active Directory synchronization, select the checkbox.
Note: You have the option to save filters and run a nightly sync to Active Directory to update any changes. - Click Test Connection.
Note: Connection test successful appears in the Test Connection field if the connection is made.
- Click Save.
Note: If you use Facilities Schedules, you can transfer the same credentials by clicking Transfer AD credentials from MLS.
Step 3: Set up roles and permissions for imported users
- Select Settings > Single Sign On > Active Directory Filters. The Manage Active Directory Filters page appears.

- To add a filter, click + Add Active Directory Filter. The Manage Active Directory Filter detail page appears.
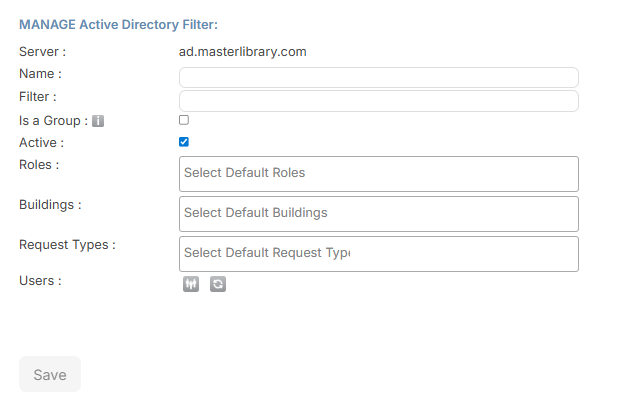
- Do any of the following:
- Enter a Name.
- Next to Filter, enter an LDAP filter string.
Example: An LDAP filter string could look as follows: OU=Staff,OU=TestSD,DC=testsd,DC=sdserver,DC=local
This example string tells the Active Directory import where to pull the users that should be created in the district's Facilities Schedules account. For example, if you only want teachers added, the filter would be set to only find district teachers.
- If the name is a group, select the Is a Group checkbox.
- If you want the filter to be Active, select the checkbox.
- Select the desired Roles the user will have by default.
- Select the desired Buildings and Request Types the user will have access to by default.
- Select the desired Users.
Notes: To view a list of all users that can be imported, click
 .
.- Users available for import show .
- Users who cannot be imported show a with a reason why they cannot be imported.
- To manually sync the directory, click .
- Do one of the following:
- Click Save.
- Click Save & Synchronize Users.
- Select Settings > > Single Sign On > Active Directory Connection. The Active Directory Integration Admin page appears.
- Confirm your Username and Password.
- Ensure the Store Credentials checkbox is selected.
- Click Save.
- Select Settings > Single Sign On > Active Directory Filters.
- Confirm you have the appropriate filters listed.
- Click . The daily sync is enabled.
Troubleshoot 'importing users' error:
You might receive the following error when importing users:
If so, try the following:
- Ensure you do not have any broader filters you can use to attempt to pull in users. Sometimes, the filter is just too narrow.
- Verify the LDAP port or LDAPS port is open.
- If the port is open, click here to download a tool to help you find your Active Directory filters.
Note: If you find the distinguishedname under Attribute, you should be able to locate the appropriate filter under the corresponding Values column.
- If you are still unable to determine the correct filters, send a screenshot of your Active Directory tree opened, along with the filters you are attempting to use, to Follett tech support.